
Halloween: our spooky chic front porch
- Tara Lenney

- Oct 7, 2021
- 4 min read
Post contains affiliate links.
IT’S FALL Y’ALL. The most wonderful season of the year is upon us!
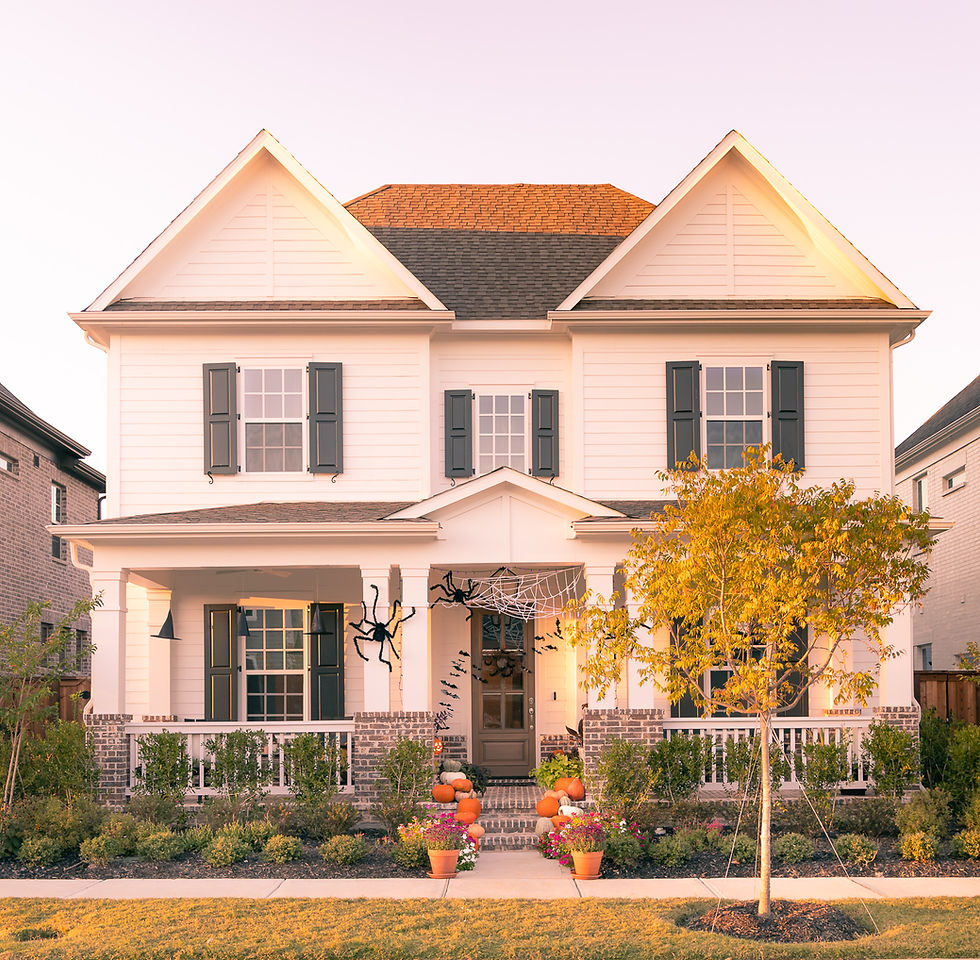
This is our first Halloween at our new house and for the first time ever, we have a front porch that is truly begging for fall décor. Funny story - in the 3 houses we lived in before this, NONE of them had a front door. They all had a side door, which didn't create much of a porch decoration moment opportunity. But not anymore!!
Okay, so we have the porch now, but how to decorate it?!?!?
My holiday decorating philosophy is tied closely to my personal design style in general – in general, I want it to be beautiful, livable, and fairly minimal. I don’t want to store 27 buckets of Halloween décor in my attic all year long and I don’t want to have to take a week to put it up (that space is reserved for Christmas where minimalism kind of goes out the window).
I will also admit though that my favorite houses to drive by and look at are the ones that are completely over the top full of lights and sounds and inflatables as far as the eye can see. But it’s just not who I am.
If you also are one who enjoys OTHER people’s yards being over the top but wants something more subdued and sophisticated for yourself, you’re in the right place. The base of this is more “fall” than Halloween specific, so much of it will be up until Thanksgiving. Come and see my take on Halloween minimalism – a few key pieces with big impact.

First and foremost – PUMPKINS. I have always wanted to be that person with an abundance of cascading pumpkins. But if you’ve been around here for a while you will know that I am CHEAP. Every garden center or pumpkin patch I’ve ever been to charges between $15-30 for a fancy Cinderella pumpkin, and $10 for a regular orange one, so I think the most I’ve ever purchased in a season is 3 (and that hurt).
I got NINETEEN of these bad boys from Walmart and the total was $90. The Cinderella ones were $6.99 and the orange guys were $4.25. In case you don’t have access to super cheap Walmart pumpkins where you are (or early birds like me have already taken them all), there are some really good looking faux ones that I’ve linked below that are a bigger investment up front, but you get to use them year after year.
This year I went through the extra effort to clean my pumpkins to help them last all season. And by “I went to the effort” I actually mean I created a child labor assembly line with my 3 kids (if you don’t put them to work occasionally, what’s the point?!). You can check out exactly what I did on Instagram here.
Pumpkins thus cleaned and arranged, I added in 2 mums to the front of our walkway. I also learned on Instagram (this is where all good information comes from apparently) that the mums you get at the stores are typically completely root-bound by the time you buy them, so they spend their blooms and die because they don’t have room to grow. I repotted mine in a pot one size larger, massaged the root ball, added in potting soil, and gave them a fertilizing and plant food bath. They released new blooms the next day! Hopefully we’ll get some more longevity out of them as well.
This is the base that will stay up through Thanksgiving. Now for the Halloween parts.

I have loved the look of hanging witch hats from the porch ceiling since I first saw them popping up on Pinterest a few years back. We have ceiling fans on our main porch ceiling so I didn’t want to hang them there, lest they all get tangled up in the fan blades, so we hung them a bit more outbound above the porch railing.
Then to throw the kids a bone I decided to go a little more fun and add 3 giant spiders climbing up the porch posts along with a web. These are super lightweight and bendable and I was able to attach them with a combo of thumbtacks, picture hanging wire, and just the spider legs themselves.

I DIY’d this wreath a few years back. It’s just a basic grapevine type wreath base from JoAnn’s that I added bats to that I cut from black felt, attaching them with hot glue. It’s a crazy-simple DIY that you could do in an hour, or even with your kids! I also linked up to a similar ready-made version below if you’re short on time (or desire) to do it on your own. The witch hats I bought also came with the bats that you see across the siding. I love how it looks like they're flowing right through the wreath.

I love the look of layered rugs on a porch. The black and white one is from Target that we’ve had for a year; it cleans up really well and is reversible from stripes to plaid. The ‘hello’ doormat is a staple I use year round, but a funny Halloween themed one would be cute as well (see the roundup below for a cute one!). A light up stack of Jack-o-lanterns and bats add a bit of fun.

I brought all the kids outside to show them the finish product, and my 10 year old looked at me sideways and said "really? There are no lights. We need to step up our game.' PARENTHOOD IS HUMBLING. So I added some purple lights, OKAY HENRY?!? But he's right. It looks better at night with the lights. I relent.
There you have it! Here’s a roundup of the pieces I used (or the most similar ones I could find that are currently available).

1. spiders & web 2. witch hats 3. bats 4. mums 5. bat wreath 6. faux cinderella pumpkins 7. base black and white doormat 8. witch please doormat 9. triple stack pumpkins 10. outdoor pillow
As an Amazon Associate I earn from qualifying purchases. Some of these links are affiliate links which means if you click the link to purchase something on this page, it won't cost you more but we may receive a commission for sharing this with you. Which is neat, because I was going to share it with you anyway! You can view our full disclosure policy here.


Grateful for Gruha Lakshmi Yojana and Janani Suraksha Yojana. Empowering women financially and supporting safe institutional deliveries significantly improve quality of life. These welfare measures bring hope and security to many families. Thank you for implementing thoughtful programs that strengthen communities and protect maternal health.
I just decorated my front porch with a minimalist Halloween theme and I'm loving it! I found some inspiration online, but my favorite part was using pumpkins to create a cozy atmosphere. If you're looking for some affordable decor ideas, I'd recommend checking out Kanban for some great tips and tricks. Happy decorating!
This is where I will share and understand the most interesting and attractive game titles in the world such as Skribblio. I hope you will support me
Slope unblocked is an exciting online arcade game where you control a rolling ball as it slides down an endless neon slope. Your ability to focus and react quickly is tested every second as the racing pace picks up!